Our website uses cookies throughout our system and to help us provide a better service. Continue to use the site as normal if you're happy with this, or click here to change your settings

Navigation: getting back on track

Navigation in the mountains is usually relatively straightforward when the weather is good. But when the cloud descends and the weather turns foul, then it can be easy to lose track of where you are.

First thing is: you’re not ‘lost’. Lost has an air of permanence. Be positive and think of yourself as temporarily misplaced. Because there are many ways to find your location again and get back on track.

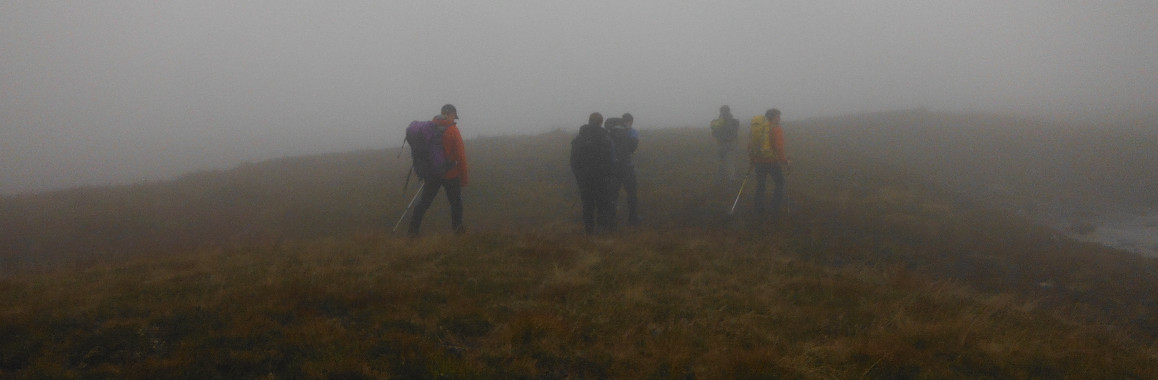
When  the landmarks disappear into the mist it can be hard to figure where you are

Don’t panic! It’s easy to get alarmed, especially if the weather is poor and the daylight hours limited. But panic makes things worse rather than better. Stay calm and don’t do anything rash. Don’t simply start walking in different directions changing bearings every minute or two in the hope that things will be sorted. You need to tackle the problem in a more controlled manner. So, stop and consider your situation and begin to gather some information. In other words, do a bit of research.

  • If you think the cloud will lift then stay put and wait a while. If the cloud base is rising and falling regularly then you may not have to wait too long to see where you are. You may spot a distant peak that you recognise. Take a bearing on it and this can give you a fix on the map. However, typically, when the cloud descends it tends to stay there longer than you have time to wait.
  • Work out how long you’ve been walking since you last knew where you were. You can use Naismith’s rule to estimate how far you have travelled from that point – see timing.
  • Think about any distinctive features you have passed since that point. For example, was there a stream junction or a knoll or steep section of ground? Perhaps you made a sharp turn along a ridge. Have you been travelling steadily uphill or perhaps downhill since your last known position? Was the ground sloping down to the left or the right? Look at the map and you may spot one of these features. This may help narrow down your likely position.
  • If you have been walking along a linear feature such as ridge or forest edge, then take a bearing along that feature. You may be able to spot this feature on the map by comparing ‘like with like’.
  • If you can see a couple of identifiable features (perhaps briefly as the cloud lifts) then take a bearing on each, adjust for the magnetic variation, and plot them on your map. Where the two lines intersect should tell you where you are. If the lines are at right angles then a more accurate fix can be gained and if you can use three features this should enable a very accurate fix. This technique is known as a resection but, in truth, it is rarely used since if you’re able to identify a number of features around you then visibility is probably so good that you are unlikely to be mislaid in the first place. It’s worth noting that if you are on a linear feature such as a ridge or stream then you can use this technique to judge your location with only a single reference point. Quite simply, your location is where the plotted line intersects the linear feature
  • If you have a GPS receiver you should be able to gain a grid reference of your current location. But you need to be mindful of its accuracy, especially when located next to a crag, in a deep sided valley or forest edge where reception may be poor. It's important not to rely totally on the technology because it can sometimes let you down.
  • If you are with other people then speak to them. They may have observed something you missed or have a clearer idea about your current location.

Having gathered as much information as possible then you need to plan what to do and take action. That plan has to be controlled and involve actions that can be retraced should they not work out. This is what you can do.

  • Decide to walk in a given direction on a bearing you think will take you to your next attack point. Work out the bearing and keep to it. Record the time you started walking and keep a note of how long you travel. Before you set off, work out from the map exactly how the land should change as the leg unfolds. If your expectations are not realised then you can return to your position by reversing the bearing and recorded walking time. It is important to check your observations as you walk against details on the map. If the two sources of information line up then you’re on your way to determining your location.
  • Similar to the last technique but, instead of walking in the direction you had originally planned to go, take a bearing roughly at right angles and walk for say 200 metres in a straight line. Keep a note of the time or, better still, pace count so that you can return to your exact starting point if need be. As you walk, take a note of the terrain and how it changes. This may provide you with additional information that allows you to examine the map in greater detail. If you do this again in a different direction, you may accumulate sufficient information to pinpoint your position with accuracy. In any case, by referring to your map as each new bit of information arises, you should be in a good position to establish your broad location.
  • Depending on the degree of uncertainty, you may decide to aim for some kind of bounding or linear feature you know is in your broad area. This might be a forest edge, stream or path/track. Take a bearing to the feature and use it as a collector. Once you meet the feature you should be in a good position to work out where you are. This might involve moving along the feature for a short distance in order to gather more information.
  • You may be able to retrace your route back to your last known position so that you can start all over again. On your way back you may cross a feature that gives you a good clue as to your whereabouts. If you have descended from an obvious summit then you can simply walk back uphill. If visibility is very poor then your body will tell you clearly whether or not you are climbing or descending. Once you arrive at the summit you can start to navigate again, but check the summit is the one you were at before.

If it transpires that nothing works and night time is fast approaching, then rather than stumbling in the dark with little sense of direction or knowledge of what terrain may unfold, you might consider staying fast on the mountain until daybreak and clear weather. If you have a mobile phone and a good signal then try to contact friends to let them know of your plans.

Using slope aspect can be a very useful tool to help you relocate. In its simplest form just use the points of the compass - north, east, south and west - to work out which direction the slope you are on is facing and then look at the map to find the slope which faces this way.

Slope aspect can be used more precisely by taking a bearing of the direction in which the slope faces.

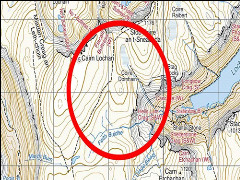
Let's imagine we have become disorientated somewhere within the area shown here.

We know we haven't gone far and we're somewhere within this circle of map.

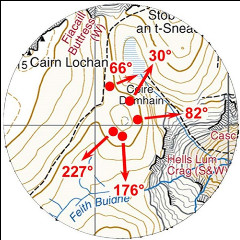
We've taken a bearing of the direction in which the slope we are on drops away.

There can be slopes of very different directions all located within a small area. The task is to find out which slope you are.

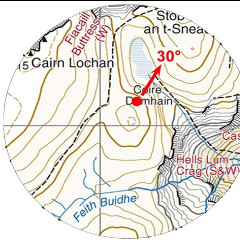
Let's assume the bearing we took of the slope on the ground was 30. This would mean that you are looking roughly down the NE aspect of this small knoll. This information should help you plan which way to travel next.

This Glenmore Lodge video explains how you can use slope aspect to help find your position.

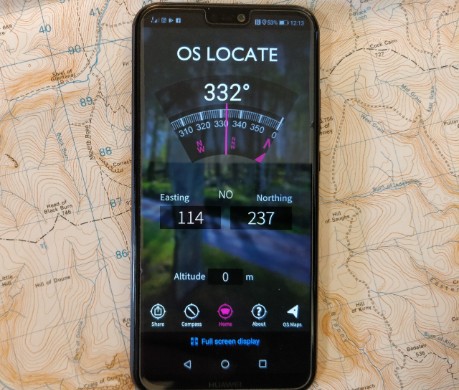
Download the free OS Locate app onto your phone. It's a simple, quick and free app which shows your location in a OS Grid Reference format which you can transfer onto your map to confirm your location.

Remember, any form of modern navigation technology should be viewed as an additional ‘tool of the trade’ to add to your navigation tool box.