There are a number of skills involved in planning and following a route, from first picking up the map to fine-tuning your progress and correcting any errors as you progress along your line of travel.
When planning your route, take into account the following:
Setting the map is the technique of positioning the map so that all the features are aligned with the ground around you.
In good visibility you may be able to set the map by eye. If identifiable features are not visible you can set the map by using the compass. Use the magnetic needle to find north and line up north on the map with north on the ground.
There are two main factors required for effective compass work:-
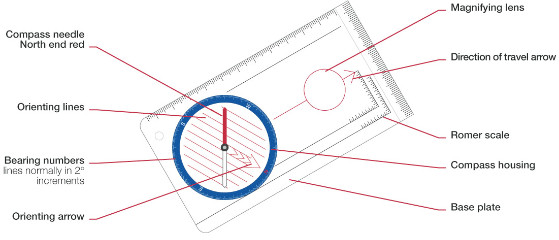
You can see the basic components of the compass in the illustration below. Glenmore Lodge have also created a video explaining the parts of the compass and one advising on the best type of compass for your needs.
1. Taking the correct bearing from the map.
Before placing the compass on the map, estimate what the bearing will be (from your location to the feature you want to go to). No need to do this in degrees, the cardinal points will do: i.e. North, South, East, West or NW, SE etc. This will alert you to the potentially serious error of lining up the compass in the wrong direction or along the wrong grid lines. Getting into this habit will mean that your bearings are always double-checked.
Place the compass on the map with the Direction of Travel arrow pointing in the direction you want to go and then line up the edge of the baseplate with your location and the feature you want to go to (the magnetic needle has nothing to do with taking a bearing from the map and you don�t need to be anywhere near the area covered by the map when you take a bearing).
You can also use the lines which run parallel with the edge of the baseplate � it is often easier to see the detail on the map more clearly by using these lines.
Once you have lined up the two points, press the baseplate firmly down on to the map to keep it in place. Rotate the compass housing so that the north arrow in the compass housing (ignore the magnetic needle at this stage) points to north on the map.
Make sure the lines within the compass housing are parallel to the eastings (the eastings are the grid lines which point north).
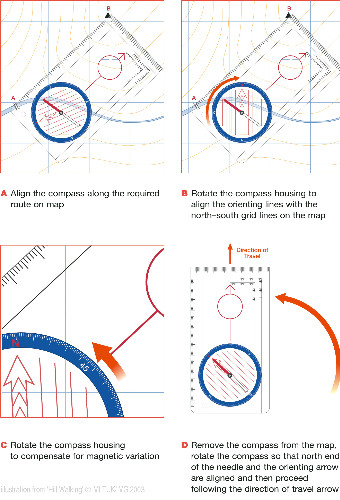
Check that you have accurately lined up:
You now have an accurate grid bearing. Take the compass off the map and note what the bearing is. You can read it at the cursor which is in line with the Direction of Travel arrow.
Before following the bearing on the ground you will need to adjust it for the magnetic variation. This variation changes depending on your location and the year. It is gradually decreasing in Scotland and currently in 2020 is negligible. This means in practice that you would NOT adjust your bearing before walking on it. Check out this website for up-to-date details of the magnetic variation for the area you intend to visit.
2. How to follow the bearing
Hold your compass in front of you with the Direction of Travel arrow pointing in whichever direction you happen to be facing. Keep holding the compass in front of you and walk your body around until the north end of the magnetic needle coincides with the north arrow in the compass housing (the north end of the magnetic needle on your compass will probably be coloured red and some compass needles also have N on the needle). It is your body that turns � not the compass baseplate. The Direction of Travel arrow now shows you which way to go.
The least accurate way to follow the bearing is to simply line up the needle as described above and �walk on the needle�, using only the Direction of Travel arrow to keep you on the right bearing. It is possible to be accurate with this method but it does require practice and most people have a tendency to drift off to one side or the other.
The most accurate way to follow the bearing is to identify features on the ground which are on your direction of travel. This obviously requires some visibility but, even in relatively poor visibility, there will often be sufficient features which you can still see. The features can be quite close to you, maybe 25 metres. Holding the compass so that you can look along the baseplate in the direction of travel and at the same time confirm that the magnetic needle is lined up with the north pointer, find a feature which lies on the bearing. It may be a rock, a clump of heather or a change in the appearance of snow or ice cover. If there is nothing to focus on ahead � i.e. in a white out � then the technique described above will need to be used.
This video from Glenmore Lodge explains about taking a bearing from the map and following it to reach your target.
Ticking off features is about being observant, having your map handy and checking your current position continuously as your walk progresses. The key skill is to keep track of where you are at all times. You do this by keeping a constant eye on the terrain and relating this to the map as your walk progresses. You should be checking the immediate and distant terrain, noting key features such as high points, crags, valleys, streams and ridges. It also helps to look backwards to see where you�ve come from. All this information helps you develop a feel for the terrain around you and where you are located within it. As you pass by each feature you can then �tick it off '.
It�s obviously very important to know how far you have travelled from your last known point and how far it is to your next point.
There are two tried and tested ways of estimating distance, these are TIMING and PACING. Timing is probably the easiest to carry out but it is often the least accurate. Pacing is usually the most accurate but it can be laborious, especially over long distances. When the weather and conditions are difficult it is often wise to use both methods concurrently.
Before using either of these methods you will need to measure the distance on the map between your present location and the target you are walking to. Some people use the millimetre scale which runs alongside the compass baseplate while others prefer to use one of the romers. A romer is the measuring scale on the side of some types of compass.
This is based on knowing the speed at which you are walking and keeping a note of when you left your last known point. Walking speed varies and is dependent on a range of factors including fitness, weight of rucksack, length of journey, wind, conditions underfoot and slope angle. A good rule of thumb would be 4km per hour and 1 minute for every 10 metres of ascent. This is known as Naismith�s Rule. Below is a timing chart illustrating this and other alternatives for those who are faster/slower.
Timing Chart
| Distance Travelled | Speed in Kilometers per hour | |||
|---|---|---|---|---|
| 5 kph | 4 kph | 3 kph | 2 kph | |
| 1000 metres | 12 min | 15 min | 20 min | 30 min |
| 900 metres | 11 min | 13� min | 18 min | 27 min |
| 800 metres | 9� min | 12 min | 16 min | 24 min |
| 700 metres | 8� min | 10� min | 14 min | 21 min |
| 600 metres | 7 min | 9 min | 12 min | 18 min |
| 500 metres | 6 min | 7� min | 10 min | 15 min |
| 400 metres | 5 min | 6 min | 8 min | 12 min |
| 300 metres | 3� min | 4� min | 6 min | 9 min |
Using a timing chart for the horizontal component makes the calculations easy although many people prefer to work it out mentally. Remember to add 1 minute for every 10 metres of ascent.
On an O.S. 1:50,000 or 1:25,000 scale map, count the number of contours and allow a minute for every contour. Remember that every fifth contour is a thick line (known as an index contour), so you can count the thick contours in multiples of five to work out the total height gain.
The horizontal time, plus the vertical time should be added together to give an overall estimation of time of travel from A � B.
Watch this Glenmore Lodge video about using timing in navigation.
Pacing is often more accurate than timing but it does require concentration. An average stride takes about 60 double paces per hundred metres. You can find out your own individual pacing figure by measuring out 100 metres and then seeing how many double paces you take to cover the distance or you can do it on the hill between known points on relatively flat terrain.
Going up or down hill or walking on rough ground or in deep snow can alter the number of paces you take. You can estimate how many extra paces you need to take to complete 100 metres at the end of every 60 double paces. It is best to measure the distance in hundreds of metres rather than by working out the total number of paces needed for a particular navigational leg. It is useful to have a way of remembering how many hundreds of metres you have paced � it�s easy to forget, especially if someone asks you a question halfway through the leg. Silva make a counter which fits on the side of your compass or you can use cord grips as counters on the compass lanyard.
Don�t always expect your timing and pacing calculations to take you right to the spot you are heading for � look at the ground around you and compare it with the contours on the map. Can you find anything that doesn�t fit in? If so, be tenacious about finding out why it doesn�t fit. Look for other features which do make sense.
Several useful techniques are described below. Deciding which one to use for a particular situation is critical. For some situations it will be best not to use any of them but to head straight for the target.
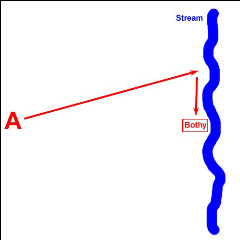
Aiming Off
Aiming Off is used when the target lies on a linear feature such as a ridge, stream or track.
In the example shown below, the task is to go from point A to the bothy. The bothy is situated at the side of a prominent stream. If we head directly for the bothy but don't hit it straight on then we won't know which way to turn to locate the bothy. By intentionally 'aiming off' to hit the stream to one side of the bothy we will know which way to turn.
This Glenmore Lodge video gives an explanation of aiming off.
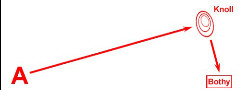
Attack Points
An attack point is a feature that is relatively close to your target but is more significant and easier to find.
In the example shown below, the task is to go from point A to the bothy. The knoll is fairly close to the bothy and will be easier to find. Locate the knoll first and then head in a new direction to the bothy.
The knoll is the attack point in this example.
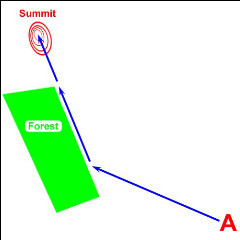
Handrails
'Handrailing' can be used when there is a linear feature that will take us towards the target.
In the example shown below, the task is to go from point A to the summit. The edge of the forest is a linear feature which can be followed towards the summit.
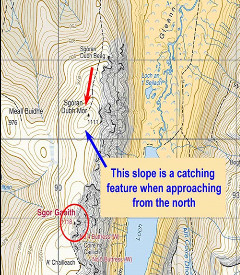
Catching Features are features in the landscape that will tell you if you have overshot your target.
In the example shown here the route goes over Sgoran Dubh Mor en route to Sgor Gaoith.
Sgoran Dubh Mor is an important feature to aim for along the way. If you find yourself going downhill before you have identified the summit you know you have gone too far. The downhill slope is the catching feature in this example.

© 2026 Mountaineering Scotland
ClimbScotland is a registered trademark of the Mountaineering Council of Scotland Limited
Mountaineering Scotland is a registered trademark of the Mountaineering Council of Scotland Limited