Monday 29th June 2020, 2:42pm
Your Navigation Checklist
If you�ve ever read The Checklist Manifesto by Atul Gawande (I highly recommend it), you�ll know how important it is for pilots, surgeons and builders to have a set of guidelines allowing them to reduce failures due to human limitations on memory and attention.
Why then as hill walkers, climbers and mountaineers do we not have such a checklist?
In fact we do. The Be Avalanche Aware tool is great for helping you plan, observe, assess, and make key decisions for journeying in the winter environment. The checklist is also very useful for the summer too. Find it here.
And there�s L.I.V.E., a useful checklist for rock climbing when setting up anchor points or belays. Loaded, Independent, Vectors (referring to the optimal angle between anchors), Equalized. Check out this video from Glenmore Lodge.
What we�re looking at today though, is the Five D�s of Navigation.
This is a great checklist to have for navigation and a great way to keep yourself in check when you feel a little misplaced if the weather turns against you and visibility is reduced.
Direction
This is the most important, helping you to Set or Orientate your map to the land and features around you. It can be too easy finding one feature (such as a stream) and making it fit the map and your possible location, therefore convincing yourself of your location. Challenge yourself to find more than 4 features, which helps to pinpoint a location more accurately. See how it's done here.
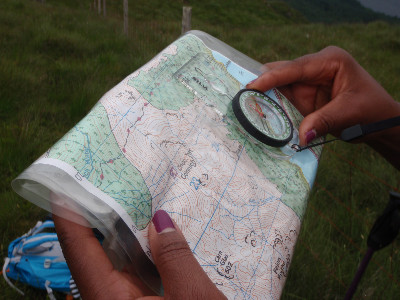
Distance
Once the map is Orientated and you can recognise features around you and find your location, you should know then Cardinal directions (North, South, East, West). From here you can carry on your journey safely or look to where your next point of interest is, weather permitting. If poor visibility, then using the Compass to take a bearing and finding the distance is a good step. Measuring distance accurately for short navigational legs is an important step to take in knowing how far you have to travel. The compass has a Roamer scale with graduations marked (1:50 000, 1:25 000, 1:40 000) that will allow measurements down to 50 metres. A good skill to develop is estimating distance by eye as this will give a rough idea of what is should be. If a very different distance is measured, then it will likely push you to double check. Watch a video here.
Duration
If you need to add another layer to your navigation to keep on track and not overshoot an important feature (such as a track, bridge, or escape route off), then timing the distance travelled works really well. Using Naismith�s rule, which gives specific times for distance travelled at various walking speeds (3,4 or 5 kph) allows good accuracy for travelling in poor weather, helping you to avoid possible dangers if you wander off randomly in the hope of finding your way off the hill! An addition to this is knowing how far 100 metres is, based on your pace or stride (which is measured with every other footstep taken). Watch here for using timing in your navigation. And here for counting paces.
Description/Design
This aspect is how you go from point A to B. Looking at what features there are along your journey and what you expect to happen on the ground, along with the direction of travel, walking on a bearing, distance of travel, and timing are all parts of how you design your journey to have success in getting from A to B. Top Tip: Have tick-off features along your journey and a catching feature to stop you from over-shooting and missing your point B. See here for using features to gauge progress.
And watch this video for combining different techniques to navigate a whole leg.
Dangers
Its always a good idea to identify features along your journey that are potential hazards or traps, which could get you into further trouble (30 degree slope of slippy grass, avalanche terrain, steep convex slopes, craggy outcrops). From this then you can alter your journey accordingly or utilise other skills (aiming off, attack points, boxing, handrailing) to help stay safe.
Let me paint you a picture, which I am sure we have all faced or will face (I know I have!). Up high on the Cairngorm Plateau having a great day, when suddenly (as is customary) the mist rolls in and surrounds you allowing only 20 metres of visibility. Immediate thoughts go to �I�m lost!� Panic sets in, logic and thought leave you. Wandering aimlessly gets you further into trouble and realise you�ve made a huge mistake. Sound familiar?
Top tip: BREATH and RELAX! Realise you�re not lost, just misplaced. Remember you have a checklist (5Ds) to follow and steadily you will get yourself going again.

Mountaineering Scotland is the voice of Scotland's hill walkers, climbers, mountaineers and ski tourers. We could not continue our vital work for Scotland's mountains and mountaineers without the support of our 15,000 members.
Membership of Mountaineering Scotland offers excellent value at less than �3 a month for adults, and includes public and civil liability insurance, a range of member discounts and offers, access to great value mountain skills courses, quarterly Scottish Mountaineer magazine and more!
Find out more about our member benefits here
Join online to get a free gift and save 25% for your first year when you pay by direct debit (new members only, T&Cs apply)
© 07/0 Mountaineering Scotland
ClimbScotland is a registered trademark of the Mountaineering Council of Scotland Limited
Mountaineering Scotland is a registered trademark of the Mountaineering Council of Scotland Limited